Search within Lanny's blog:


Leave me comments so I know people are actually reading my blogs! Thanks!

Thursday, July 09, 2020

Google trained ResNet50 in 0.47 seconds, setting new MLPerf AI training record

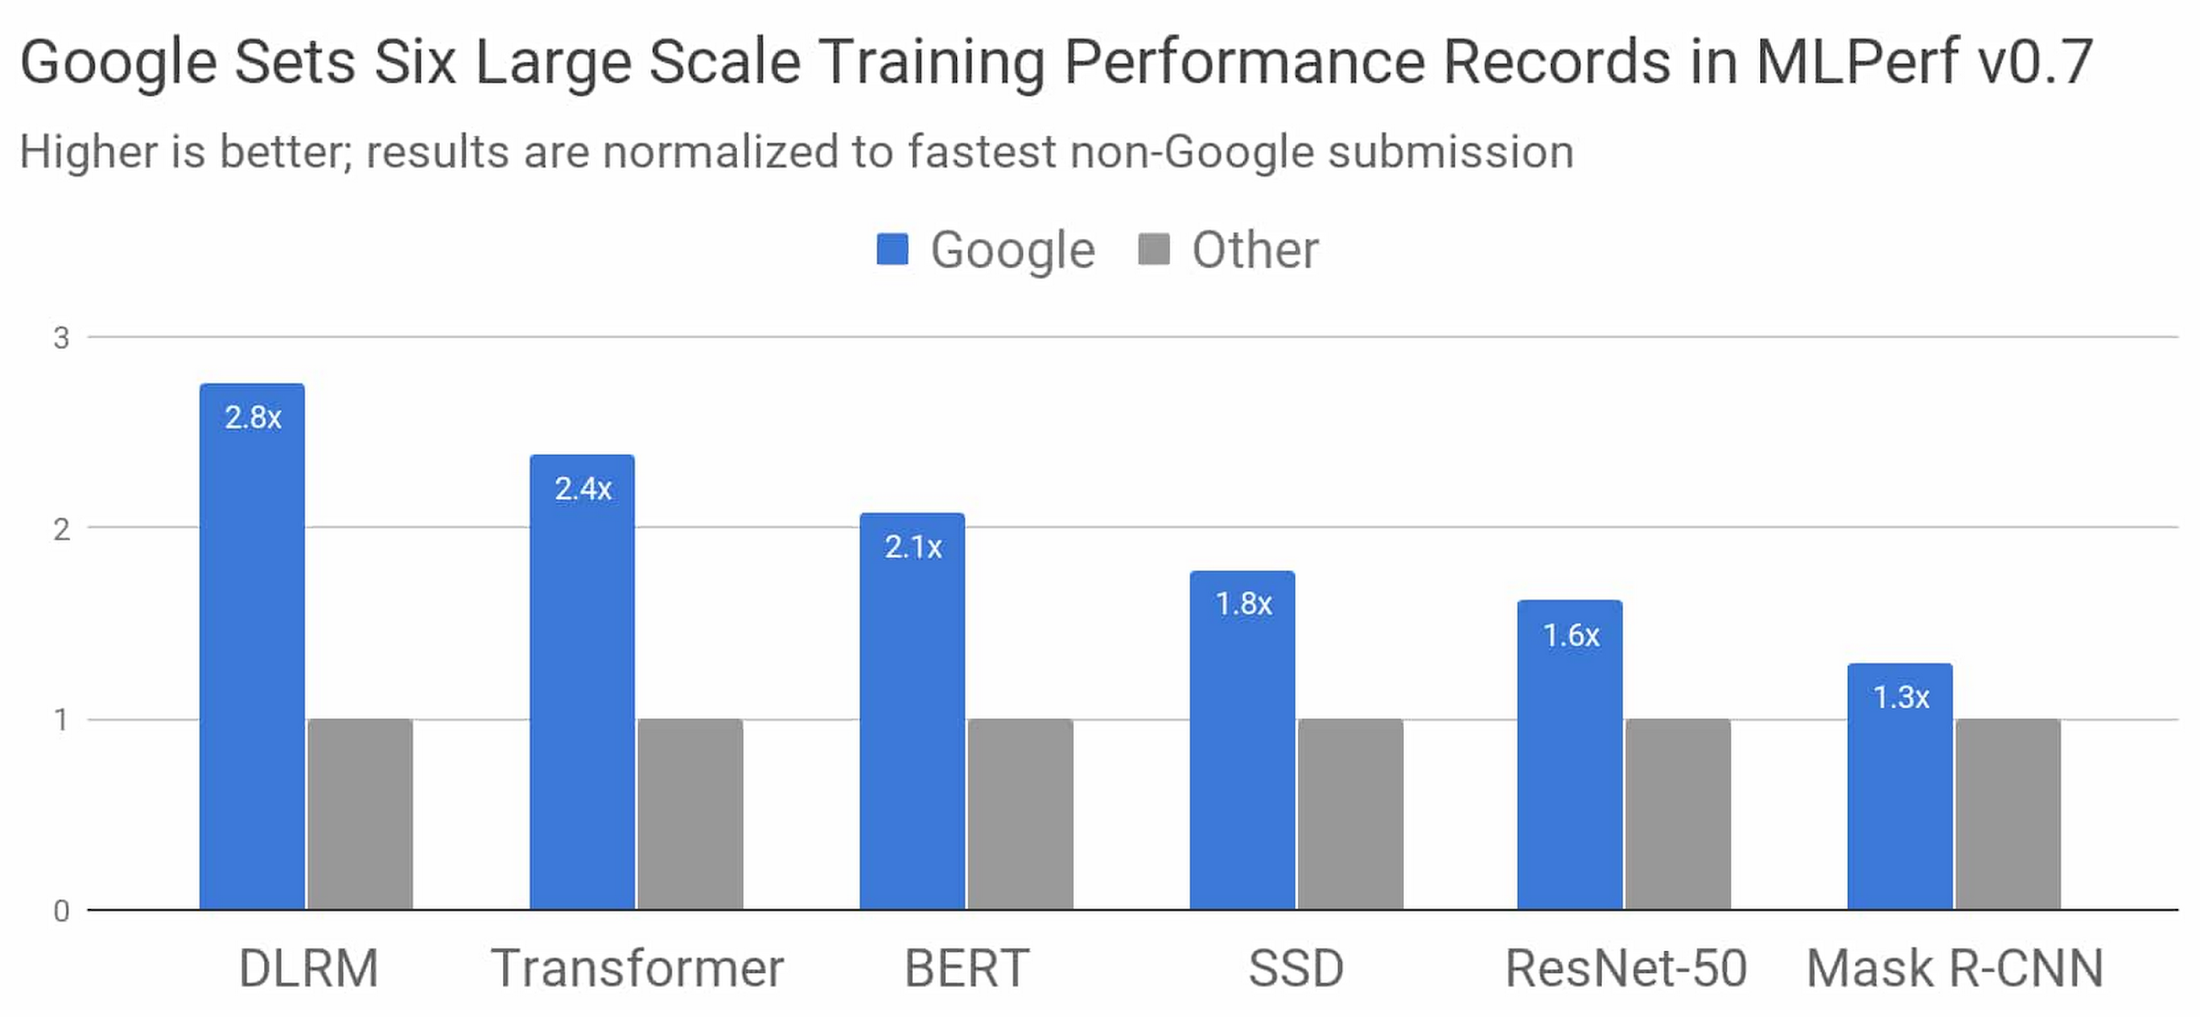
Google has built the world's fastest ML training supercomputer and was able to set new records in six out of eight MLPerf benchmarks.

Speedup_of_Googles_best_M.0860040916660770.png

For example, they trained ResNet50 in 0.47 seconds. What does this really mean? According to Import AI newsletter:

Multi-year progress: These results show the time it takes Google to train a ResNet50 network to convergence against ImageNet, giving us performance for a widely used, fairly standard AI task:
- 0.47 seconds: July 2020, MLPerf 0.7.
- 1.28 minutes: June 2019, MLPerf 0.6.
- 7.1 minutes: May 2018, MLPerf 0.5.
- Hours - it used to take hours to train this stuff, back in 2017, even at the frontier. Things have sped up a lot.

You can read more about it from Google's Blog.

But What Does This Really Mean?

In a recent video posted by Lex Fridman, he talked about how the very hot GPT-3 compares to a human brain. Specifically, he told us that GPT-3 has 175 billion parameters and costs a whopping $4.6 million to train.


So here's what it means:
Only tech giants like FAANG, Microsoft, and alike can afford the hardware and money to train large networks like this, and small startups/players really don't stand a chance.
You can learn what GPT-3 is in 3 minutes in this article.

So anyway, while we celebrate the advancement of AI, we also have to be careful about the increased impact capital has on innovation. I really do not want this to turn into something like our legal system where big corporations always win even though they "lose" the case or have to settle.


A pandemic does not just go away no matter how much you ignore it, deny it, or wish it would just magically disappear.


BTW: The easiest way to remember my blog address is http://blog.lannyland.com

Wednesday, July 08, 2020

Daily Battles: How to navigate and control tabs with shortcuts in your Chrome browser

If you are like me and love to leave lots of tabs open in my Chrome browser, here are some very useful keyboard shortcuts for you to control your tabs.


Note that these shortcuts work both on Windows and Mac machines.
  • Ctrl + Tab: Switch to the tab on the right.
  • Ctrl + Shift + Tab: Switch to the tab on the left.
  • ⌘ + Shift + [: Also switch to the tab on the right.
  • ⌘ + Shift + ]: Also switch to the tab on the left.
  • ⌘ + Option + Left Arrow: Should also switch to the previous tab. This one doesn't work for me because I use Spectacles and BetterSnapTool, which also use these shortcuts.
  • ⌘ + Option + Right Arrow: Should also switch to the next tab. Same as above. 
  • Ctrl (⌘ on Mac) + Number: For example, Ctrl + 5 would switch to the 5th tab from the left.
  • Ctrl (⌘ on Mac) + W: Close the current tab.
  • Ctrl (⌘ on Mac) + Q: Close all tabs in the Chrome window. Chrome now asks you to confirm, in case you hit the shortcut by mistake, which I have done many times.
  • ⌘ + Shift + W: Don't know if this is a bug, but this will close all tabs in the Chrome window without confirmation. So make sure you don't use this one.

By the way, the following shortcuts on Mac might be useful:
  • Ctrl + ⌘ + Q: Locks the screen and requires login next time.
  • Ctrl + Number: Switch to that Desktop/Space.
  • Ctrl + Up Arrow: Show all windows in current Desktop/Space and show all Desktops/Spaces at the top.
  • Ctrl + Down Arrow: Show all windows for the current application.
  • Ctrl + Left Arrow: Switch to the Desktop/Space to the left.
  • Ctrl + Right Arrow: Switch to the Desktop/Space to the right.
Hope you find these useful!

Video of the Day:

This is what I play once my code compiles with no errors!


BTW: The easiest way to remember my blog address is http://blog.lannyland.com

Tuesday, July 07, 2020

Daily Battles: How to enable AirDrop on your Mac when you send file from iPhone to Mac

When you try to use AirDrop to send files to a Mac computer from your iPhone, you might find that the Mac computer is not even an option on the AirDrop list on your iPhone. This is because AirDrop is disabled on your Mac by default. All you have to do is to enable it and you should be able to receive files via AirDrop as usual.

To enable AirDrop on your Mac computer, follow the steps below:

1. Open "Finder" from your launcher.
2. Click "Go" from the menu at the top of your screen.
3. Select AirDrop from the menu list and it opens the AirDrop window.
4. In the AirDrop window, you can specify whether you want to be discovered by everyone or only by your contacts.
5. Now AirDrop becomes an item on the left panel at the top.


6. Lastly, once the files are transferred from iPhone to your Mac, you can find them in the Download folder.

That's it. Hope you find this helpful!

Image of the Day:


BTW: The easiest way to remember my blog address is http://blog.lannyland.com

Monday, July 06, 2020

Daily Battles: How to prevent your Windows 10 computer from disconnecting WiFi

Have you noticed that your Windows 10 computer keeps disconnecting from WiFi? So whenever you want to use your computer, you have to manually connect it back to your home WiFi network?

I had this problem with one of Philip's many physical existences. (Philip is my Smart Home Assistant that consists of a bunch of microservices running on a bunch of low-grade throwaway computers.) It was a laptop with a cracked screen (wife dropped it).

This gets a bit annoying because every time I want Philip to print something, I have to manually connect the computer to home WiFi. So I did a bit of research and found the solution.

Turned out Windows 10 automatically puts the WiFi network card in power-saving mode, which then disconnects it from my home WiFi, even though I leave the computer plugged in all the time.

So here's how you can resolve the problem:
  1. First right-click on your WiFi icon in the taskbar at the bottom right corner of your screen and select Open Network and Sharing Center.


  2. Once in Network and Sharing Center, select Change adapter settings on the left panel.


  3. In the next screen, right-click on your home WiFi network and select Properties.


  4. In the properties popup window, select the Power Management tab, and then make sure to uncheck Allow the computer to turn off this device to save power. Don't forget to click OK to apply your changes.


That's it. Your computer should stay connected to your WiFi network from now on. Hope this helps!

Picture of the Day:

Google AdSense sent me a violation report. Turned out my web page can not mention the word "Weapon." So what am I going to do with a web page showing my translation of the famous Chinese Martial Arts novel named "Seven Weapons" by Gu Long? These are swords, sabers, and spears. How ridiculous. What kind of world do we live in today?


BTW: The easiest way to remember my blog address is http://blog.lannyland.com

Sunday, July 05, 2020

Daily Battles: How to display MP3 files correctly in Windows 10 File Explorer

When looking at a folder of MP3 files in Windows 10's File Explorer, it is super annoying that Windows 10 would choose to display all the files as if you are looking at an Audio CD, where you see info such as title and contributing artists, instead of seeing the file size and when the file was created.

 
There is a way to fix that. It's just not very obvious. Let me show you how:
  1. In File Explorer, go to the parent folder containing all the MP3 files. Rightclick on the folder and select properties.
  2. You should now see a window that looks like the one below. Go to the Customize tab and then click the dropdown box under Optimize this folder for. Select General items instead of Music.
  3. You can also go up a few levels with your folders, do the same thing and then check the checkbox called "Also apply this template to all subfolders", so you don't have to do this once for each folder.
  4. Then click OK to apply your changes.

Once you make this change, your folder content will look normal again like this:


Hope this helps! Moving on to the next battle!

Video of the Day:

Can you tell the difference between cheap and expensive pianos? 
Make sure you read the comments!


BTW: The easiest way to remember my blog address is http://blog.lannyland.com