Search within Lanny's blog:


Leave me comments so I know people are actually reading my blogs! Thanks!

Tuesday, January 12, 2021

Daily Battles: When Should I Change Water Filter with a Brita Pitcher?

Using a water filter for your drinking water can make tap water taste much better while saving on plastics bottles and containers. The most popular brand of water filter system is the Brita brand such as the one shown below (about $16.99 on Amazon). They sell both the pitcher and water filters. 

However, how often should you change the water filter, so the filter is not dirty, water still tastes good, and you can also feel assured that you are still consuming really filtered water?

The pitcher itself has a button and light indicators of when you should change the filter. However, it is a very confusing design and you would likely find yourself not knowing how they work. Pushing the button makes all the lights flash and you also don't want to accidentally reset the detector.


Even on Brita's website, there are confusing instructions. For some models, you are supposed to push the button for 2 seconds. This picture above shows 5 seconds. Some others say hold the button for 8 seconds.

So here's your solution:

After you change your filter, push and hold the reset button for 8 seconds doesn't matter what the instructions says and whichever model of pitcher you are using!
So how do you know when it is time to change the filter? Don't press that reset button. It will just make all the lights flash and make you accidentally reset your timer.

Turned out you just watch the lights while you are filtering a new batch of water. That will activate the detector which will let you know if it is time to change the filter.

Here's a video I found useful describing the different steps you should take to replace a water filter.


Good luck! Let's drink good water and also preserve the environment!

Leave a comment if you find my blogs useful. You can also follow me on Twitter for more useful tips and tutorials!


Many times, you don't really need the exact answer, you just need a range.


BTW: The easiest way to remember my blog address is blog.lannyland.com

Monday, January 11, 2021

Daily Battles: How To Not Receive Phone Calls on Your Mac

If you want to stop receiving phone calls from your Android phone on your computer (could be a Windows computer too), read this blog: instead:

Daily Battles: How To Not Receive Phone Calls on Your Computer From An Android Phone


Imagine you are in a video-conference meeting, and you have diligently turned the ringer on your iPhone off. Then in the middle of the meeting, while you are presenting, a phone call comes in and starts making loud ringing sounds on your Mac computer. Even worse, turned out it is one of those "we have an urgent message about your vehicle warranty" calls (or "the second warning").


Looking all over your Mac and you fail to find how to disable this. You still want your iPhone messages to show up in your Mac so you can reply to messages by typing on a comfortable keyboard instead of the tiny on-screen thing on your phone. You just want to turn off the incoming phone call.

Turned out the control is not in your Mac computer. It is in your iPhone settings.

Go into Settings - Phone - Calls on Other Devices and then toggle it off as shown in the screen captures below.


That's it. Good luck with your online meetings in the future!

Video of the Day:

If you make it fun, people will do extra work!

BTW: The easiest way to remember my blog address is blog.lannyland.com

Sunday, January 10, 2021

Daily Battles: How To Retweet Someone's Twitter Video With Your Own Caption Without Downloading and Re-Uploading the Video

On Twitter, you probably have seen big name accounts (normally they have a checkmark next to their names showing they are verified) tweeting video clips with the original video poster's name as a tag link at the bottom of the video. Have you ever wondered how that was done?

Here's an example of me doing it:

You could try to download the clip (there are lots of online tools available for you to do that), and then re-upload it. But that takes a lot of effort/bandwidth, and you also can't link the original poster's name below the clip. That's just not the right way to do it.

It's actually really easy to do that on a computer (which I use most, cause I hate looking at my tiny phone screens and get my eyes all tired). All you have to do is to first copy the original tweet's URL, e.g.,

        https://twitter.com/lannyland/status/1362863201243652096

And then just add /video/1 to the end, and now the link becomes:

        https://twitter.com/lannyland/status/1362863201243652096/video/1

Include that in your own tweet, and you'll be able to successfully embed the clip while still giving the original poster the credit. 

I normally simply retweet someone's funny videos. But if I really want to hide the original poster's caption and use my own, I use this method. Big-name Tweeters such as Rex Chapman do this a lot. Here's an example:


So there you go, it's that easy to embed a video. Happy tweeting!


Reusability is the foundation of computer programming. 


BTW: The easiest way to remember my blog address is blog.lannyland.com

Saturday, January 09, 2021

Daily Battles: How To Play Different MP3 Songs In Similar Volumes

When you play multiple MP3 songs on your computer, especially the ones you have downloaded off the Internet, it is possible that each song has its own volume. Some might play with such low volume that you can't really hear anything while others might have super high volumes that blow your socks off.

Luckily, computers today are smart enough to figure out what's the generally acceptable volume for human, and can automatically level off the volume, so your socks don't get blown off.

If you are using VLC Media Player (which I am using on a Mac), then it is really easy to set up.

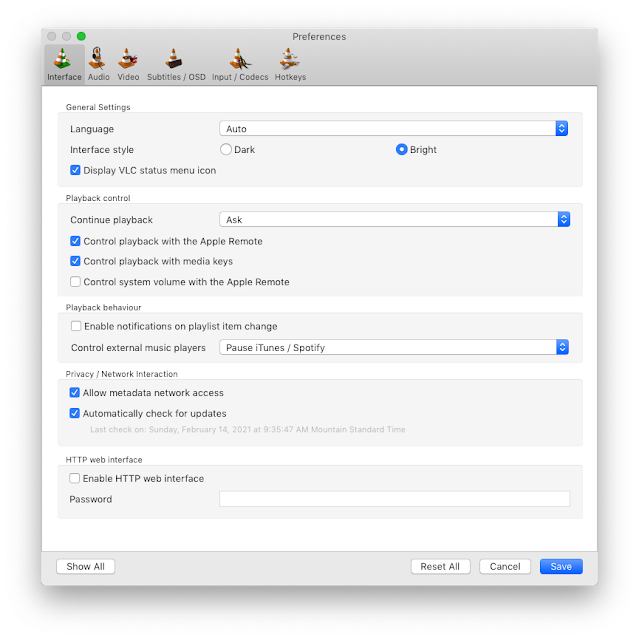
You want to go to the menu and then select the first item on the menu (normally File on Windows computer and VLC Media Player on a Mac), then select Preferences to open the settings window.

It is very important that you click the Show All button at the bottom. Then you get a different screen. Here you want to expand Audio and then select Filters. On the right side, make sure the option "Volume normalizer" is checked as shown below.

Now click Save, and then restart VLC Media Player, and you are all set. All MP3 songs will play at the same volume automatically so you don't have different songs as dramatically different volumes.

If you are not using VLC Media Player, and you are also using a Windows computer, you can also set auto volume leveling at the computer level. It is called Windows Loudness Equalization. You basically want to go to the property page of your speakers and check the "Loudness Equalization" option under the Enhancements tab.


Check out this web page for more detailed instructions if you can't figure it out.

Hopefully, this can be helpful in your problem-solving today. Moving on to the next daily battle!

By the way, if you wonder how you can download one or multiple videos off YouTube, you can check out my other blog post:

Leave a comment if you find my blogs useful. You can also follow me on Twitter for more useful tips and tutorials!

Video of the Day:

Another one of my favorite Parody Commercials: iPhone 5


BTW: The easiest way to remember my blog address is blog.lannyland.com

Friday, January 08, 2021

Daily Battles: How To Download All Videos In a YouTube Playlist In Batch

The pandemic has made many work from home and kids going to online classes from home. That makes Internet bandwidth a very hot commodity.

Just to make matters worse, ISPs like Comcast/Xfinity started charging extras if you go over the data cap on your home Internet data usage. I have just recently found out that I almost breached the data cap last month.

I used to listen to music on YouTube while doing stuff. I even have this huge YouTube playlist called Lanny's List of Just Nice Songs. Guess the streaming actually used up quite some bandwidth, so family members were complaining about slow Internet speed, and Xfinity is warning me about data usage.

Anyway, so how do we resolve this problem? I decided to just download all the songs on my huge playlist to my computer as MP3 files. This way I can still listen to them (I don't really need to watch the videos that go with them), I won't be using up a lot of bandwidth to download them (since Mp3 files only), and when I listen to them, I won't be using any of the valuable family Internet bandwidth.

Then I realized that there is actually no easy way for me to download all the songs in my big playlist. I choose to not install any local programs and only go with free online tools. So eventually I figured out a solution.

There's a website called ddownr that will let you download multiple YouTube videos on a playlist in a batch. Here's how the interface looks like:


Of course, you can also download video clips from a playlist if that's your desire. For me, I only needed the music MP3s.

If you happen to have a lot of copyrighted material in the playlist, then you will have to use a different web site (linked from the ddownr website. But you can also just go straight to the web site: loader.to. One caveat is that you can only download 21 clips/MP3s in your playlist at a time. But it still beats downloading 392 songs manually one at a time. Here's how the interface looks like:


Note that occasionally the tool fails to download a song from the playlist (sometimes the video is still showing in the playlist, but when you go to it, the video is not available anymore). In this case, you can just find another copy and then use the same interface to download just one video/MP3. You can also use a different website if you just want to download one clip/Mp3: yt1s.com. But I would still recommend the loader.to tool, because it does a better job storing thumbnail and artist metadata into the Mp3 file.

In a separate blog post, I described how you can save a YouTube playlist to a text file. You can check it out if that's something you are interested in doing.

Daily Battles: How To Keep Track Of Videos in a YouTube Playlist In Case Videos Are Deleted


Hope you find this blog useful in saving your bandwidth!

Leave a comment if you find my blogs useful. You can also follow me on Twitter for more useful tips and tutorials!


Video of the Day:

SNL Pelotaunt Commercial (Parody)
There's always a trainer that suits you!


BTW: The easiest way to remember my blog address is blog.lannyland.com

Thursday, January 07, 2021

Daily Battles: How To Keep Track Of Videos in a YouTube Playlist In Case Videos Are Deleted

If you create playlists on YouTube to group videos/songs you like together, it is a real pain when you go back to the playlist one day and find out that some videos are either deleted or made private (like the picture below). The worst part is that you don't remember what video you put in there, so you can't just find another copy to replace it!!


So next time after you have put in all the hard work for a playlist (like this one, for example, Lanny's List of Just Nice Songs), make sure to back up the names so you can always go back to find out which video on your list has disappeared.

So how do you back up the list easily? For example, as a text file?

What I found very useful is this free online tool at TuneMyMusic.com. The instructions on the screens are super intuitive:

1. You select YouTube as the source (you can also do this for other popular sites like Spotify, Apple Music, iTunes, or Amazon Music).
2. Next, you put in the link of your playlist and click Load playlist.
3. On the next screen, you can leave everything selected, or only select the videos you are interested in saving. Then click Select Destination.
4. Now, just select Export to file. You have the option to select TXT or CSV as the output format. I personally prefer CSV (Comma Separated Values) format, because you can open it from any spreadsheet or database program, and then it's really easy to sort.
5. At the last screen, just click STart Moving My Music and then specify where you want to store the text file on your computer.

As you probably already figured out, you can use this same free tool to move a playlist from one music source (e.g., Amazon Music) to your favorite music platform (e.g., Spotify).

Here are the screenshots of all the steps in case you need it.


Always backup your playlist. Don't let your work go to waste!


By the way, if you are interested to know how you can download all videos in a YouTube playlist in batch, check out my other post below.

Daily Battles: How To Download All Videos In a YouTube Playlist In Batch

Leave a comment if you find my blogs useful. You can also follow me on Twitter for more useful tips and tutorials!


Video (Playlist) of the Day:

Lanny's List of Just Nice Songs (Be warned, it's a lot of nice songs!)
Starting with one from a neighbor indie artist!


BTW: The easiest way to remember my blog address is blog.lannyland.com

Wednesday, January 06, 2021

Daily Battles: How to Restart Bluetooth on Mac Mojave from Terminal

Mac OSX is not a great operating system when it comes to Bluetooth. Things get especially bad when you use Bluetooth for external speakers or wireless headphones. If you were playing music, the sound will break up and stays breaking up. In other words, the Bluetooth service on your Mac doesn't know how to recover from a bad state.

One thing you can do is to just go to the top right of the menu bar and then right-click the Bluetooth icon to turn Bluetooth off and then back on. But sometimes that icon is just not there.


If so, you can always go to the system preferences screen, find Bluetooth settings, and then turn Bluetooth off there.

But one problem you likely will have is that as soon as you turn Bluetooth off, you realize you just disconnected your mouse or your trackpad because most likely they are Bluetooth devices.

So is there a way to fully restart Bluetooth service (turn if off, and then turn it back on, and then reconnect all your Bluetooth devices) just from your terminal (using the command line)?

You are in luck. The answer is a definite YES! And this method works not only on Mojave but also on other versions of Mac OS as well!!

So here's what you have to do.

1. First you need to install a utility called blueutil. Run this command to install it: 

brew install blueutil

2. Once the utility is installed, you just have to run this command:

blueutil -p 0 && sleep 1 && blueutil -p 1

If you don't want to remember all the parameters, just put this in a shell script file and call the script each time you want to restart Bluetooth service.

That's it, it's that simple!! You don't have to use the laptop touchpad to turn on Bluetooth again (because likely you have it closed and connect to multiple external monitors! You don't have to reboot your computer. You just run your script!! Credit goes to DjDCH on StackExchange.

If you find this kind of tip useful, you should definitely also read my other blog about restarting audio services on MacOS.


God created the keyboard so we can do everything just using the keyboard! 


BTW: The easiest way to remember my blog address is http://blog.lannyland.com

Tuesday, January 05, 2021

Daily Battles: How to Find Large Files on Your Mac Computer

If you are looking for tools for other operating systems or devices, see these links below.

Find large files on your Android Phone

Free space and delete unwanted files on your iPhone or iPad

How to find large files on your Windows Computer


No matter how big your hard drive is, one day you'll realize you are running low on storage space and have to do some housekeeping.

So what is the best way to find out what's eating up your hard drive space on your Mac computer? You could use Finder and search by file size. But that is just not a very convenient way to find where the large files are located. It also doesn't tell you if a folder is using up a lot of space, even though the files in that folder are not the largest ones.

The easiest way I've found is to use a free app called:

Disk Inventory X

Use the above link to download the installation file (.dmg) to your Mac computer, then double click to open the container and then drag the app file to your Application folder.

To open the app, you need to open the Application folder in Finder, and then Control+Click the app. Then select open, and you'll see a popup like the one below where you can allow the app to run.

Click open to start the app, and then select a hard drive it starts the scan (might take a while), and you'll see a screen that looks like this below.


On the left, you have a folder view where you can see which folder is taking up large chunks of your hard drive. You can also drill down to subfolders and see the space usage of each.

In the middle, you have what's called a "treemap" where large blocks represent large files. Blocks are color-coded by document type. For example, all movie files are in one color while all application files are in another color. You can click on a block to see where the file is located and how much space it is using. You can also just right click on the block and select "move to trash" to delete the file.

On the right, you have a breakdown of your hard drive usage by file type.

One important thing to remember is that after you "move to trash," you need to empty your trash to really claim the storage back.

Hope you find this useful. If you need a place to archive your large files such as movies or music, you can get a 4TB external hard drive that's completely powered by your computer from Amazon for about $90.

Moving on to the next Daily Battle!


Video of the Day:

Ran into an excellent Kung-Fu beer commercial! Be like beer!


BTW: The easiest way to remember my blog address is http://blog.lannyland.com

Monday, January 04, 2021

Daily Battles: How to free space and delete unwanted files on your iPhone or iPad

If you are looking for tools for other operating systems or devices, see these links below.

Find large files on your Android Phone

How to find large files on your Windows Computer

Find large files on your Mac Computer


No matter how much storage space our iPhone (iPad) has, make it 256GB, we'll still find ways to fill it up and get the dreaded Storage Full warning message.


So what are ways to free up storage space on your iPhone? There are four categories you can look into.

  1. Delete apps that you no longer use.
  2. Offload apps you don't use very often.
  3. Free up storage from apps that save a lot of data.
  4. Find large files and remove them.

Delete apps that you no longer use

You can just press on the app icon and hold until all the icons start shaking and also shows a cross at the upper corner. Then press the cross will delete the app.


What I recommend is to go into Settings, General, iPhone Storage, and then scroll down to see the apps with their storage data usage listed. Then select one of them will open the settings page for that app and you have the option to Delete. This way you can delete the app that uses a lot of storage.


Offload apps you don't use very often

Sometimes you have an app that you don't use often but would still want to use it occasionally. So you don't want to delete the app and lose your data.

In this case, you can use the feature in iOS called Offload Apps. What this feature does is that it will remove the app from your device to save space, but it will keep the icon still on the screen and also keep all the user data. Next time you open the app, it reinstalls the app and then puts your data back so you never lose any settings or user data.


To enable this feature, you can follow the instructions in this article:


Free up storage from apps that save a lot of data

Some apps are notorious when it comes to using a lot of space. One such example is WeChat, which will just keep using Gigabytes of free space until your storage is full. Other social media apps might also use a lot of your space, such as TikTok, Instagram, Facebook, Twitter, Snapchat, etc..

What I recommend with this kind of apps is to delete the app and then reinstall it. This will get rid of all the saved data (such as old video clips, large images, etc.) and really free up lots of storage space.

Just following instructions from the first section of this blog by going into SettingsGeneraliPhone Storage, and then scroll down to see the apps with the most storage usage and delete from there.


File large files and remove them

The last one, actually probably the most useful one, is to manage large files on your iOS device. These are typically video files either attached in a message or email or simply videos you recorded yourself.

For large file attachments, you can actually review large attachments. Go into SettingsGeneraliPhone Storage, and then scroll down to the app that might have large attachments. Click on the app and you'll see the Review Large Attachments option.


For videos you recorded yourself, with older iOS versions, there's really no easy way to review file size. The best you can do is to open the Photos app, and then just scroll through to see if you have long video clips (you can see the length info in the clip thumbnail). The longer the clip, likely the larger the file size.

With newer iOS devices (e.g., with iOS 14.2), though, Apple has made life a bit easier for users.  Just go to your Albums and look under Media Types Videos. You can see all your videos with their size information right there. You can also go into Photos settings (SettingsGeneraliPhone Storage, and select Photos app), and then click Review Personal Videos. Just find the really big ones that you don't really need and delete them to free up more space.


Hope this can be helpful for iOS users. Remember, maintenance is always an important task for your computing devices.


The more resource you provide, the more resources people will use.


BTW: The easiest way to remember my blog address is http://blog.lannyland.com

Sunday, January 03, 2021

Daily Battles: Microsoft Word Synonym menu empty and not showing any synonyms

If you use Microsoft Word for creative writing (or translation), you probably use a feature in Word called Synonyms Suggestion. You select a word in your doc, right-click on it, and then select Synonyms from the menu. Word will then suggest a bunch of words that have similar meanings to you. To be honest, it is also a good way to learn new vocabulary.


And one day, after right-clicking on the word, you find an empty list when you go to the Synonyms submenu. Does it mean there are no synonyms for the word you selected? You start testing other words and soon realize something is wrong and you can no longer use the synonyms feature.

Well, I had the exact problem. But don't worry, I also found the solution. The problem is because Word somehow got confused on the language of the document. And when it doesn't know or think you are using a different language, it doesn't know what synonyms to get (such as the one shown below).


To fix this problem, use CTRL+A to select the entire document, then go to Review on your menu, and then click the Language button on your tool ribbon. Make sure you select English and then click OK. Now if you try the Synonyms submenu again, everything is back to normal.


Hope this helps those that also ran into this problem. Happy writing (or translating)!!


Caring for indoor plants can reduce stress (unless it is a cactus).


BTW: The easiest way to remember my blog address is http://blog.lannyland.com